Tech is Easy
How to Create a Quiz in Google Forms (Step-by-Step Guide)
To create a quiz in Google Forms, go to forms.google.com, open the Template gallery, choose Blank Quiz, add your questions, and set the correct answer and points for each one with Answer key. Google Forms then grades every submission for you. This guide is for teachers, trainers and anyone who wants to make a quiz paper or test with answers that marks itself.
What you need
- A Google account, signed in on your browser (you will see your profile picture at the top right)
- A list of questions and their correct answers
- About 10 minutes for a short quiz
1Start a blank quiz
Open your browser and go to forms.google.com. Click Template gallery and scroll down to the Education section. You can pick a ready-made template such as Exit Ticket, Assessment or Worksheet, but to build your own from scratch click Blank Quiz.
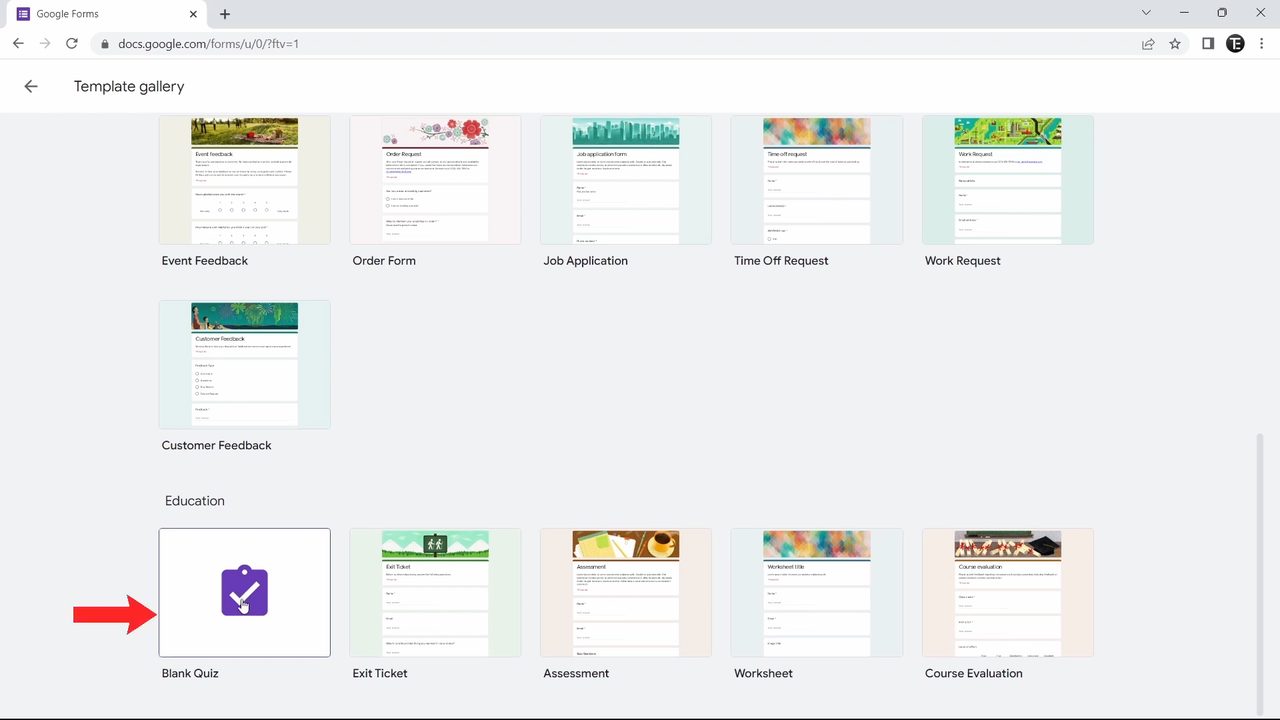
2Add a title and description
Click the title at the top of the form and type a name for your quiz. Below it, click Form description and add instructions or a short message for the people taking it, for example the time limit or "All the best!".
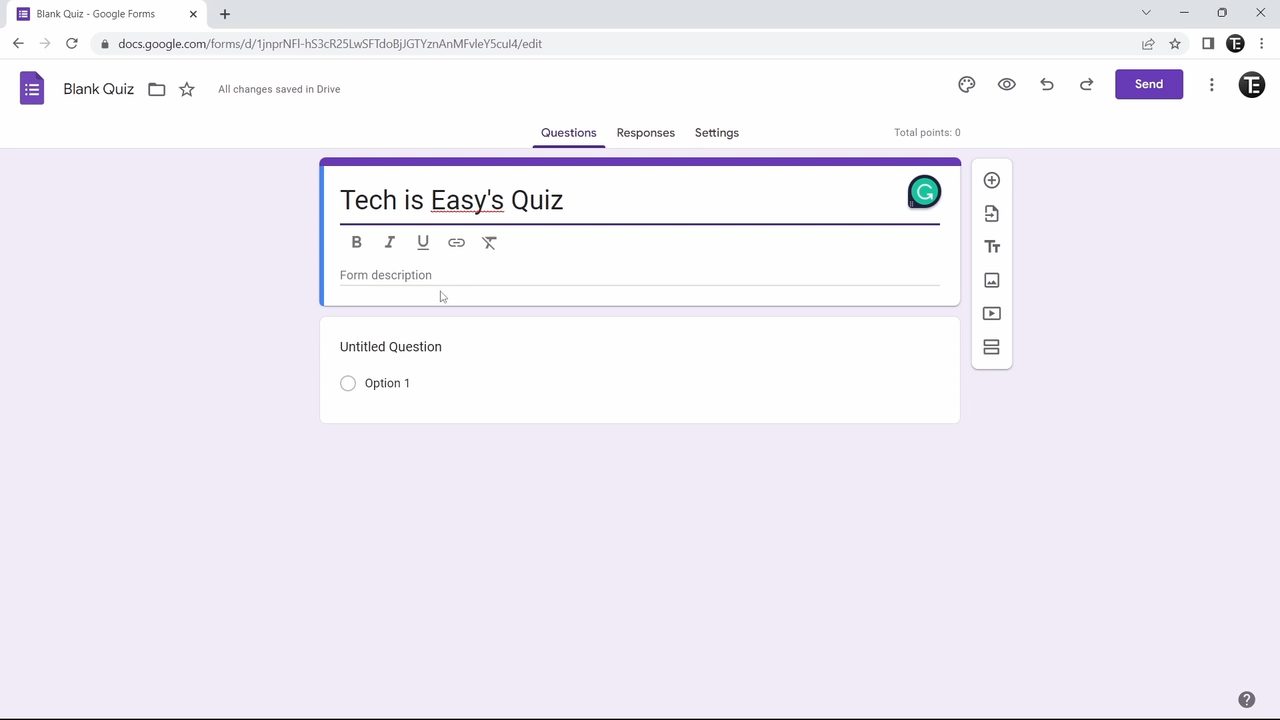
3Write your first question and pick the answer type
One question is already on the form. Click it once and type your question, such as Name. Then open the drop-down on the right to choose what kind of answer you expect. Short answer suits names, Paragraph suits longer written answers, and Multiple choice, Checkboxes and Dropdown give fixed options. To force people to answer, turn on the Required switch at the bottom of the question. Required questions show a red asterisk to respondents.
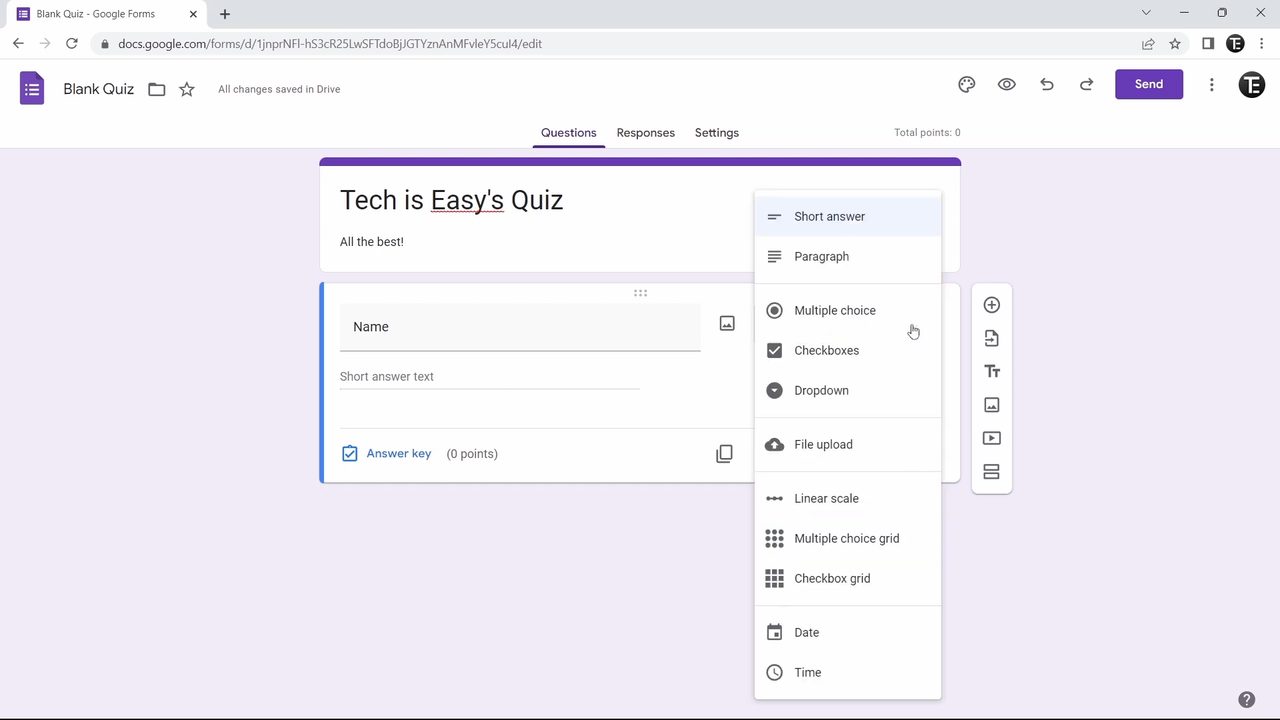
4Add a multiple choice question
Click the + (Add question) button in the floating toolbar on the right. Type the question, select Multiple choice, click Option 1 to type the first answer, then click Add option for the next one. Google Forms often suggests options for you, as it did with "No" here.
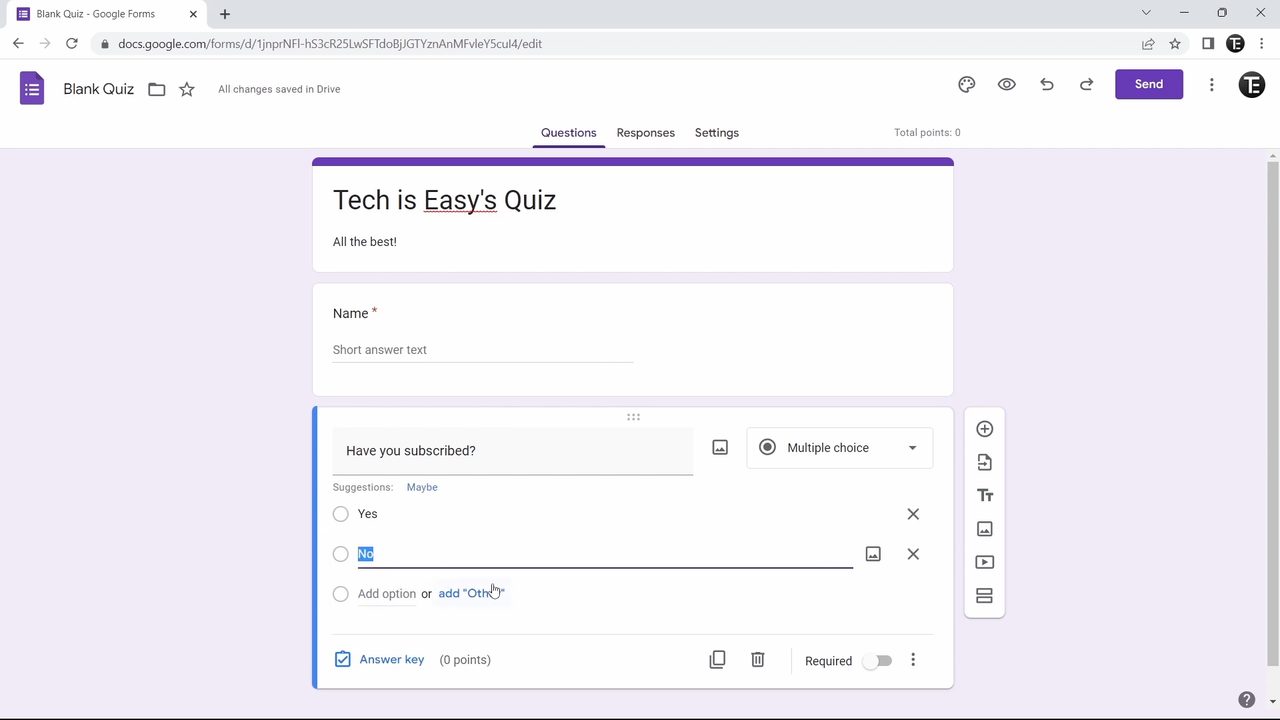
5Set the correct answer and points with Answer key
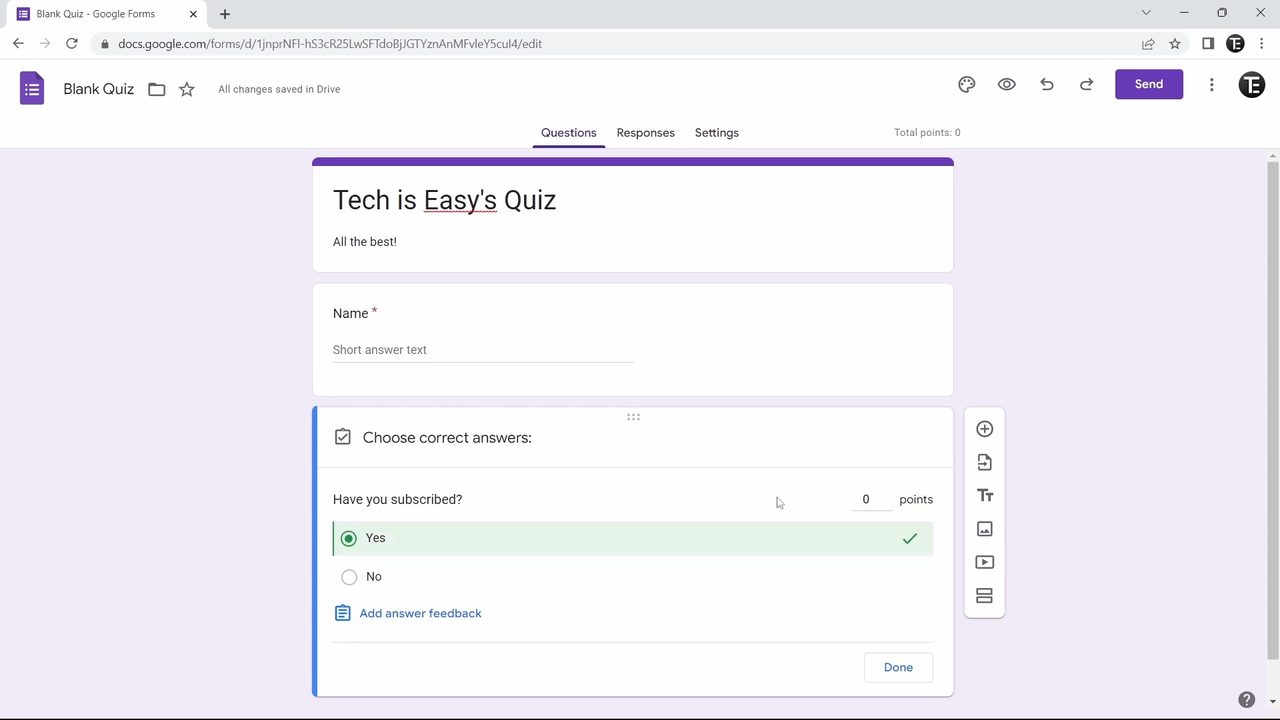
This is what turns a form into a self-grading quiz. Click Answer key at the bottom left of the question, select the correct option, and enter how many points it is worth at the top right (we used 5). Click Done. A green tick now appears next to the right answer and the question shows its points.
6Use checkboxes for questions with several right answers
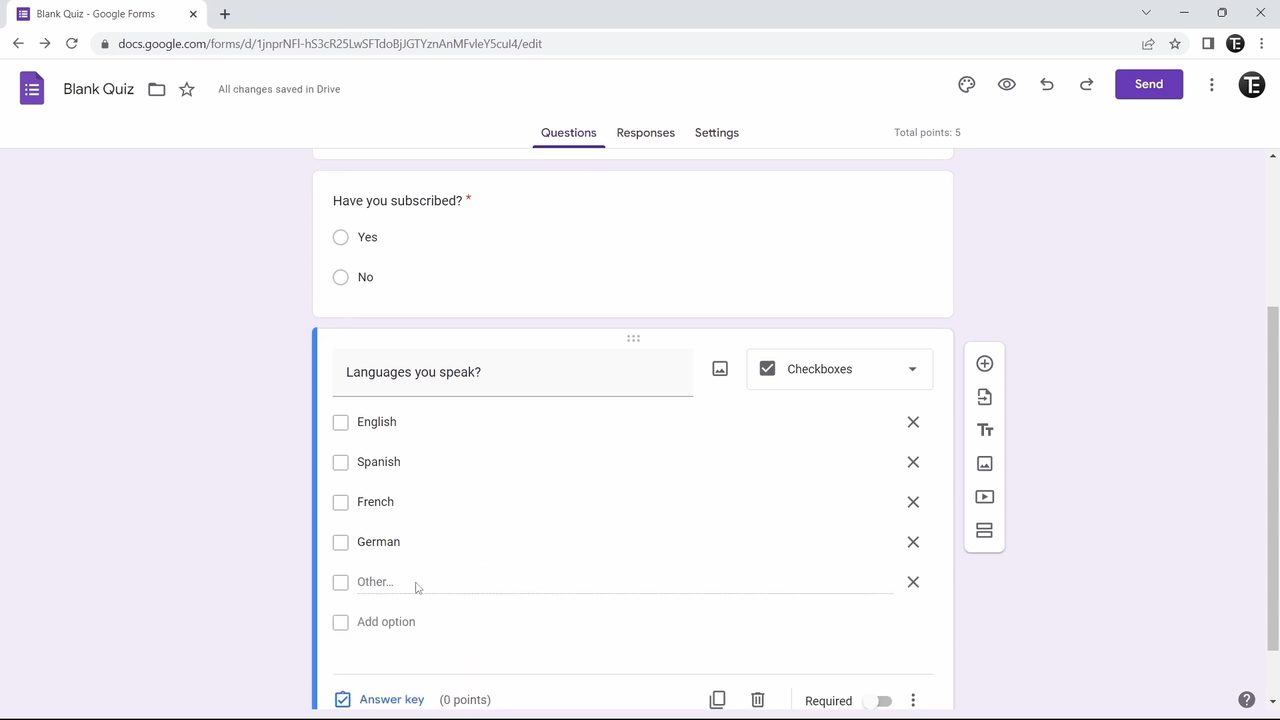
For a question like "Languages you speak?", choose Checkboxes so people can tick more than one answer. Add each option, and click add "Other" if you want to give people a box to type their own answer.
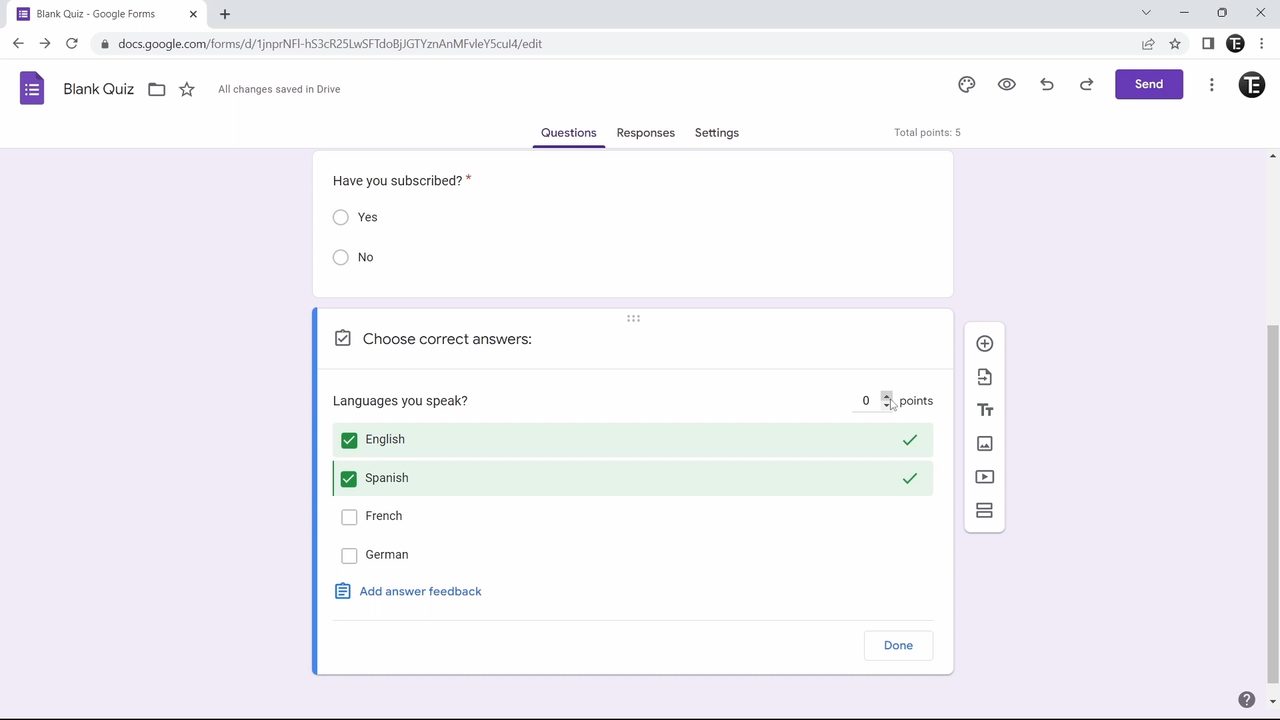
Open Answer key again, tick every correct option, set the points and click Done. The Total points counter at the top right of the form goes up each time you add points.
7Add a paragraph question
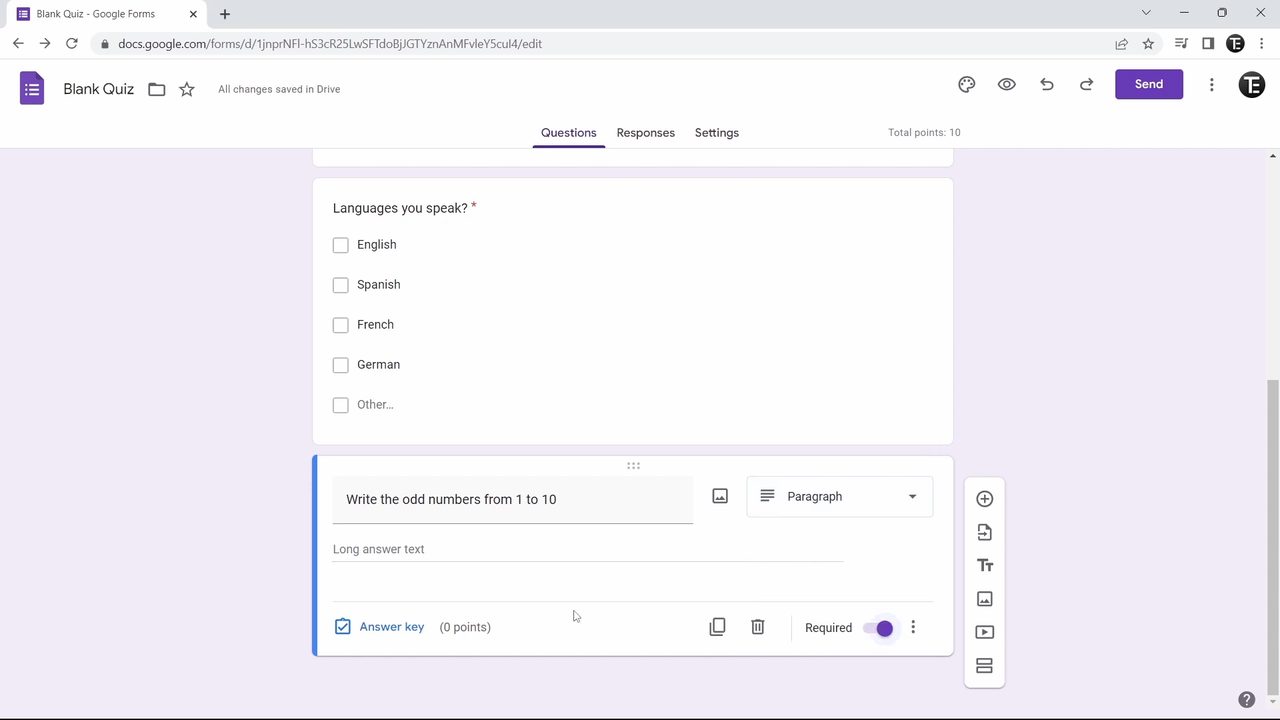
For written answers, add a question and choose Paragraph from the drop-down. Keep in mind that Google Forms can't mark paragraph answers as correct automatically. You can still give them points later by grading the answers yourself in the Responses tab.
8Preview the quiz and test the score
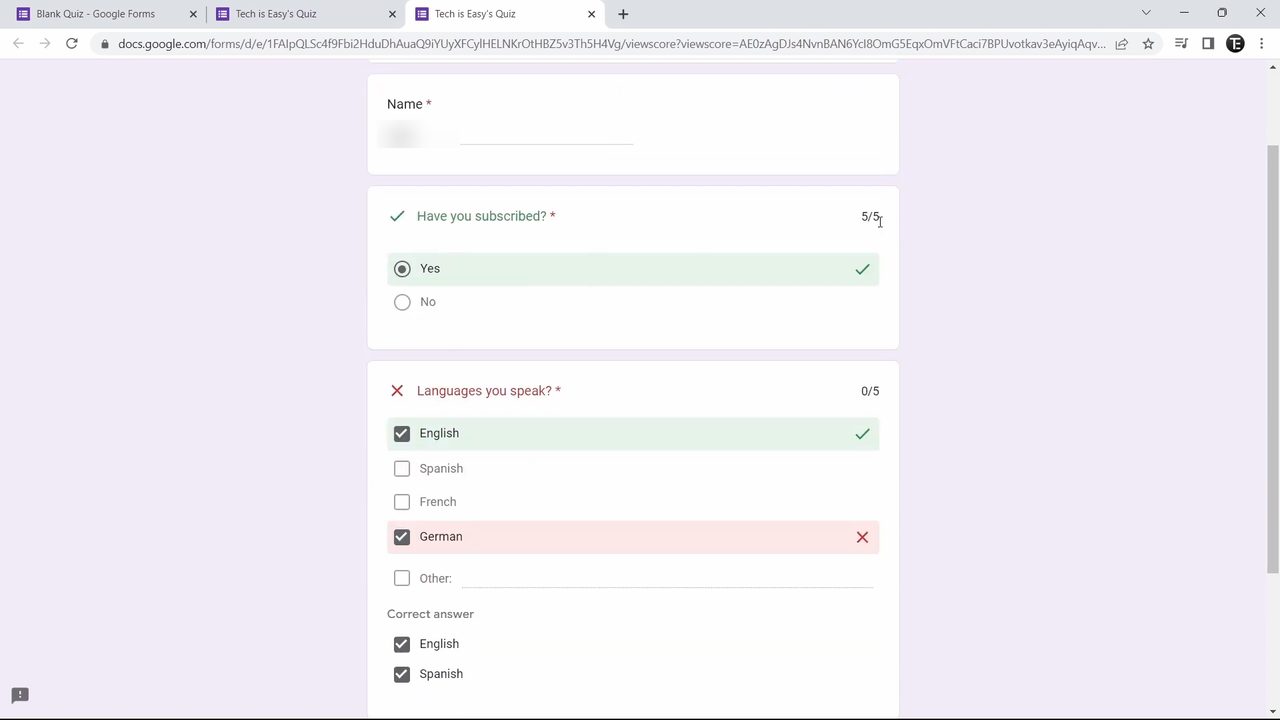
Click the Preview (eye) icon at the top to see the quiz the way a student sees it. Fill it in, click Submit, then click View score. Each question shows the points earned, with a green tick for right answers, a red cross for wrong ones, and the correct answer underneath. In our test the checkbox question scored 0 out of 5 because German was ticked instead of Spanish.
9Choose your quiz settings
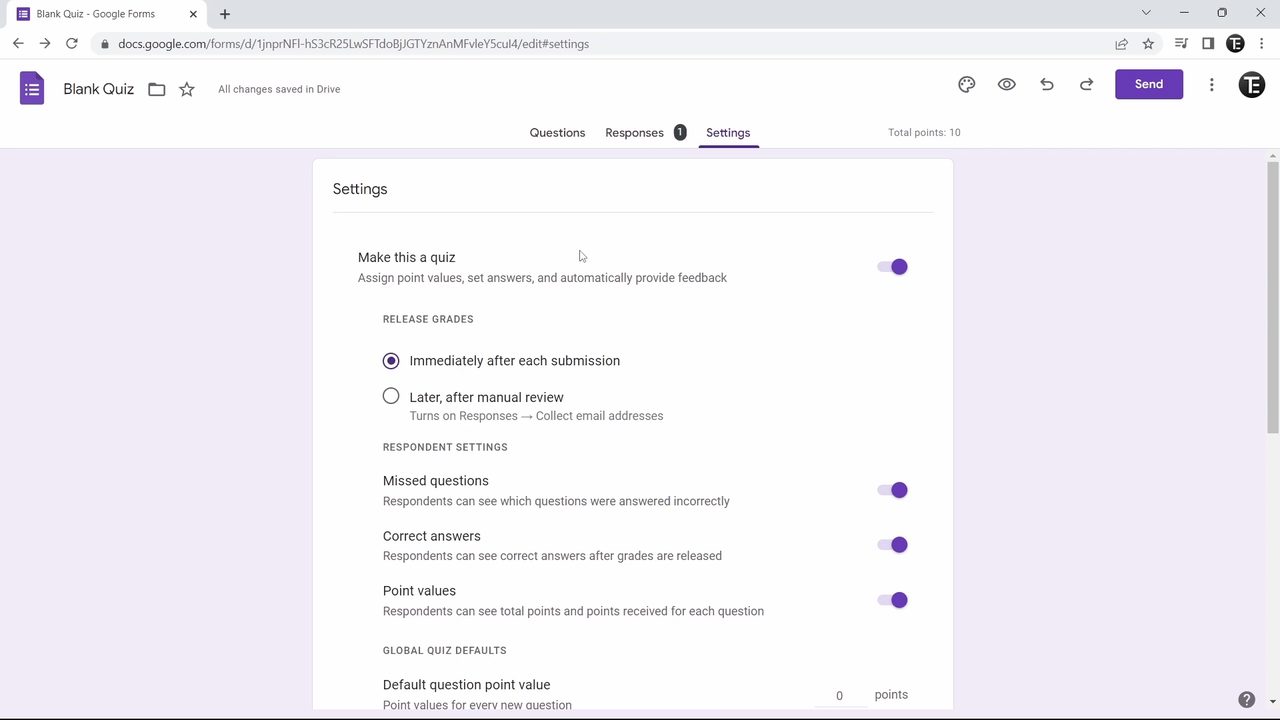
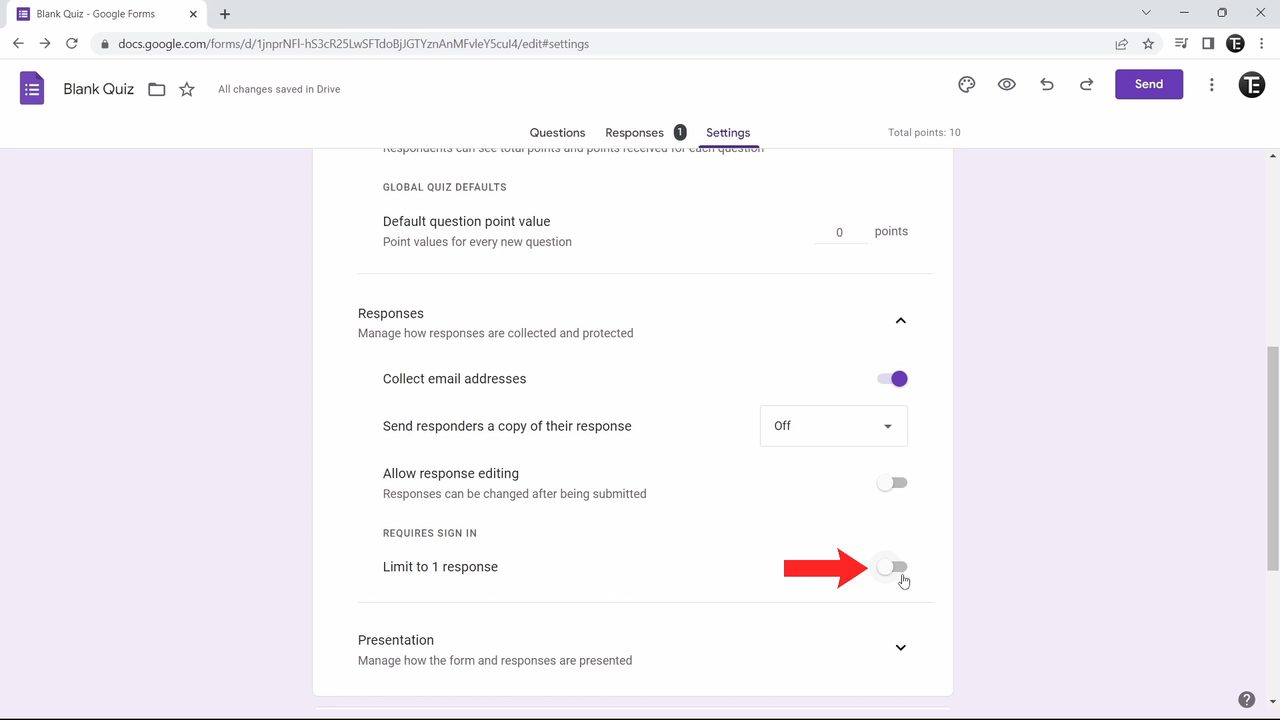
Click the Settings tab. Here you can decide: - Release grades: Immediately after each submission, or Later, after manual review. The second option turns on email collection so you can send scores out when you are ready. - Respondent settings: whether people can see Missed questions, Correct answers and Point values. - Responses: turn on Collect email addresses, and Limit to 1 response so each person can submit only once (this requires them to sign in with a Google account). - Presentation: Shuffle question order gives each person the questions in a different order, which helps against copying in a class.
10Share the quiz and check the results
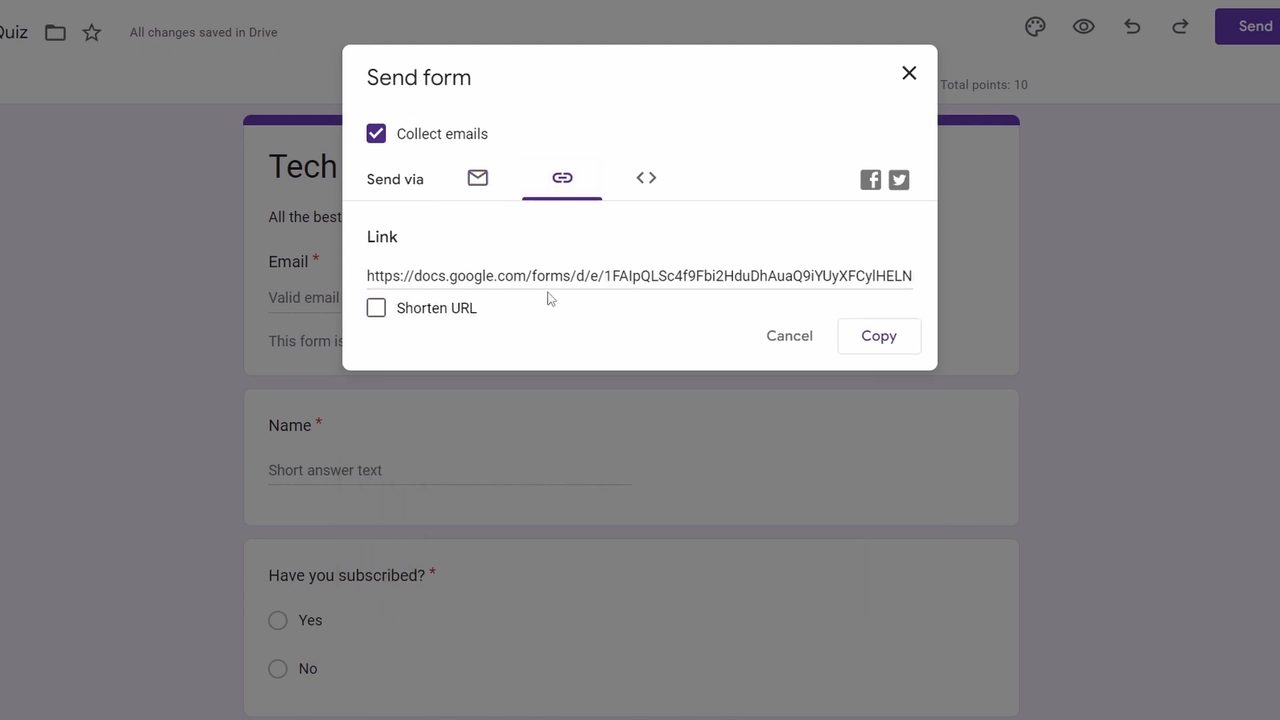
Click Send at the top right. You can email the quiz by entering addresses in the To box, or click the link icon to get a link. Tick Shorten URL for a shorter link, then click Copy and share it in a chat, class group or email.
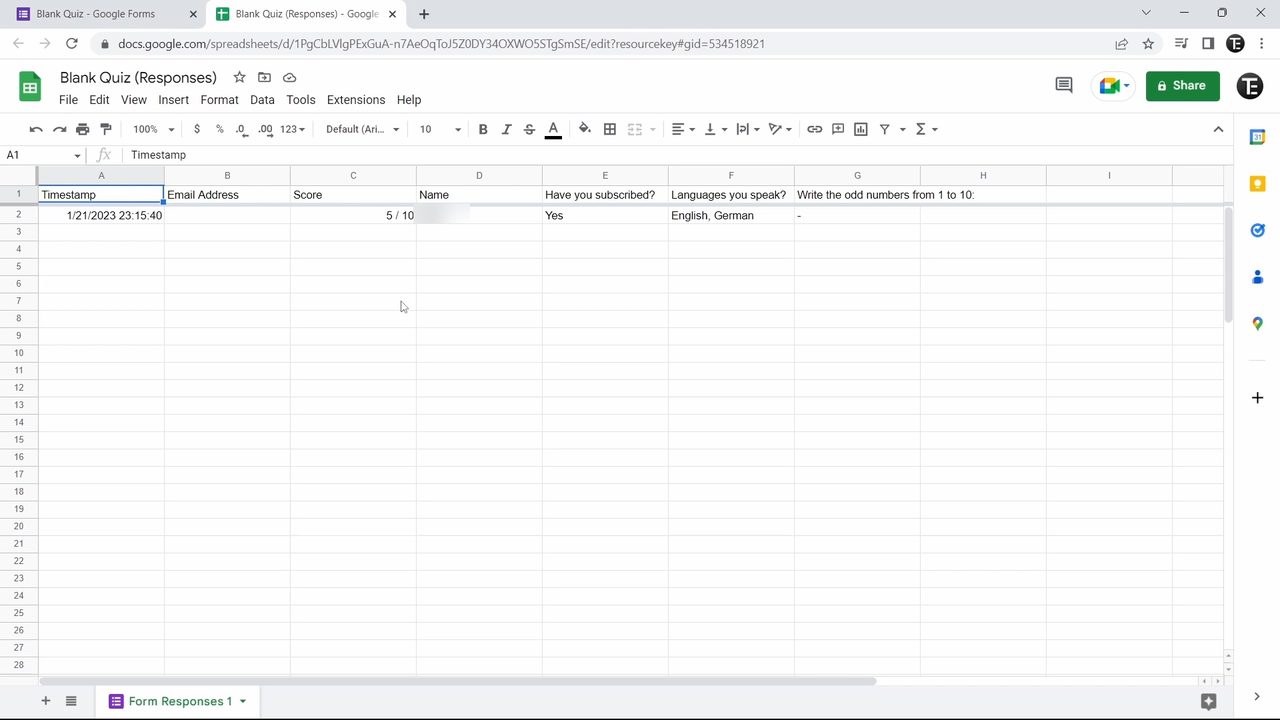
When people start answering, open the Responses tab. Summary shows charts for the whole class, Question shows every answer to one question, and Individual shows each person's submission. For a full list, click Link to Sheets, choose Create a new spreadsheet and click Create. The sheet includes each person's score and updates by itself whenever someone new submits.
Tips and troubleshooting
- No Answer key button? The form is not set as a quiz. Open Settings and turn on Make this a quiz. This also works for any existing form you want to convert.
- Which questions can be auto graded? Google's help page lists Short answer, Multiple choice, Checkboxes, Dropdown, Multiple choice grid and Checkbox grid. Paragraph answers need manual grading.
- Short answer grading is strict. If you add an answer key to a short answer question, the response has to match one of the answers you entered, so a spelling slip can lose the points. Multiple choice is safer for exams.
- Students can't open the link? If you use a school or work account, Settings may restrict the quiz to your organisation. Turn off the restriction under Responses to share it outside.
- Limit to 1 response makes everyone sign in, so people without a Google account won't be able to answer.
- Depending on your version of Google Forms, you may also see a Publish button that has to be used before the quiz accepts answers.
Google's own guide, Create & grade quizzes with Google Forms, covers grading individual responses and emailing results after review.
Related guides: How to Link Google Forms to Google Sheets and How to Share Google Form Responses.
FAQ
How do I make a quiz in Google Forms with answers?
Start a Blank Quiz (or turn on Make this a quiz in Settings), add your questions, then click Answer key under each one to pick the correct answer and set points. Google Forms marks each submission automatically.
Can I convert an existing Google Form into a quiz?
Yes. Open the form, click Settings and turn on Make this a quiz. The Answer key option then appears on every question that supports it.
Can students see their score right away?
If Release grades is set to Immediately after each submission, they get a View score button after submitting. Choose Later, after manual review if you want to check answers first and release scores yourself.
Can I stop people from taking the quiz twice?
Turn on Limit to 1 response under Responses in Settings. Respondents then have to sign in with a Google account, and each account can submit only once.
Related guides